Artuta Art Tips 6: Valentine’s Day Card
- Feb 1, 2024
- 3 min read
Updated: May 6, 2024

Valentine’s Day is a fun occasion to show your appreciation to those you care about by making them homemade cards! Artuta Art Tip 6 will be about making a Valentine’s Day card.
I was tasked with creating an Artuta Valentine’s Day social media post, which I immediately thought I’d make a card for. While thinking about what an Artuta Valentine’s would look like, I thought about all the typical colors and imagery we are used to seeing around this day. I decided to go a different way and use Artuta’s school colors of green and purple combined with the iconic heart shape for my card.


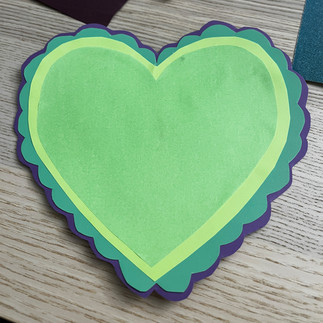
Starting from the center of the heart I cut the base heart shape. You can see a crease in the paper, a tip to create an even heart is to fold the paper in half and draw half a heart before cutting the shape out.
When the paper is cut, it should result in an evenly shaped heart. It doesn’t have to be heart shaped, you could choose to do a circle, squiggly shape, or uneven heart.
The first layer will be the top and also the smallest of all the shapes cut. From here, I chose the next color. Then applied glue to the cut heart shape and pasted it to the new piece of paper. Leave enough space to cut around the heart. Since I knew I had a couple more layers to cut, I cut around the heart shape leaving enough space to expose the neon green color. I did this two more times with different colors and creating scalloped edges. You can make the edges bigger or thinner and cut as many layers as you like.


Along with thinking about the colors and shape, I thought about the message for this card. When it comes to hearts on messages I always think of Conversation Hearts! I thought it would be fun and the perfect way to express appreciation. You can trace out block letters first if it helps. Sometimes cutting paper into similar sized squares helps with getting the letters to be around the same size. It is also fun to have different sized letters.


As you can see I have two versions. After I was happy with the text and placement of the text, I glued everything down. So far it reminded me of an avocado ad. It was ok, but something was missing, it was still a bit plain and not funky enough for Artuta standards (I think).


I had these eyes laying around that I thought might work. I added the eyes using small drops of Elmer’s glue and it came together with more of a monster than avocado feel to it. You can of course add whatever embellishments (pom poms, glitter, stickers, rhinestones, etc) to your card. I just happened to have a bag of wiggle eyes already.


This is an extra step since I am writing about a social media post I created. I knew I could not just have the completed card on my table, I needed to tie it together with a background. I tried different backgrounds before I landed on a purple piece of felt that seemed very fitting. I was very happy with the way it looked and it brought a pop to the card!
I hope you enjoyed this Artuta Art Tip! Have fun making art!

Jessica Lee
Hello! My name is Jessica. I am a collage and soft sculpture artist based in New York City. I am originally from East Los Angeles, California. I love making things and believe that art is an extension of yourself. I am always excited to see what Artuta students create!


Comments